All posts by Igor Ridanovic

24p and 23.98p. Which Do I Use?

When in doubt choose 23.98p.

Both refer to frames per second (fps) rate that a camera records to film or tape. “P” stands for “progressive.”

Although most people will talk about “24p” what they really mean most of the time is “23.98p.”

24p is rare in HD acquisition. Few technical benefits of true 24p are outweighed by the additional cost of working at this frame rate.

In some cases camera manufacturers follow this simplification trend and advertise their cameras as “24p capable” adding to the confusion. It’s always worth researching or testing if a camera menu comes with a 24p option only. In such case it is likely the camera has a 23.98p option and is not capable of 24p!

23.98p (to be more precise 23.976p) is certainly a strange frame rate to use but it is more consistent with legacy video equipment that’s in use in NTSC dominated regions like North America.

24p may take over at some point in the future. But for now unless specifically asked for 24p stick to 23.98p.

What’s a Good Workflow?

The one that takes you to the finish line quickly.

Technological advances of last ten years have significantly altered digital picture acquisition and post production. While in the past you were limited to film or Betacam SP tape, today’s options are seemingly endless.

There is a meandering road from SD cameras, formats, implementations of HD, editors and tapeless acquisition to the final color corrected master.

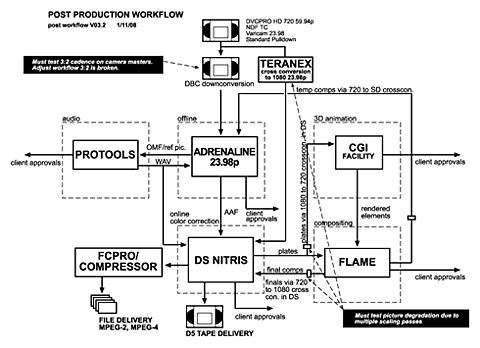
A good workflow is the one that addressed the creative needs and financial parameters of your show and offers a technically sound method of bringing you from start to finish. There is no one particular workflow that will work for everyone every time.

The new equipment on the market has allowed better quality (not always) at lower prices but has also complicated the once straightforward map of production and post production process.

In order to avoid costly surprises in post it is necessary to carefully plan out and test out your workflow. Click here to download a PDF version of Figure 1.


post production workflow diagram

Fig. 1. Post Production Workflow Diagram

Upconverting from SD

Will not make the quality better.

Upconversion is a process of transferring a standard definition master onto a high definition videotape.

SD video can contain as little as 6 times less information than HD video. Upconverting from lower resolution to higher resolution does not create more detail. It merely interpolates the picture to create missing information from scratch. Upconverted may look acceptable but it will always lack sharpness and visual detail when compared to native HD material.

There are several considerations when doing upconversions.

Source and destination frame rates need to be taken into account. 29.97fps frame rate of North American video does not convert well to HD standards that run at 23.98fps. An exception is SD material that was originally shot at 24fps or 23.98fps and transferred to tape with 3:2 pulldown.

European SD which runs at 25fps generally converts better to HD.

Aspect ratio difference between 4×3 SD video and 16×9 HD video will cause the upconversion to irretrievably lose top and bottom parts of the frame. Pan and scan method can be used to adjust which part of the frame is cropped off so no important action is lost.

Slow Motion in Post

The slomo is better than ever.

Slow motion playback can be achieved in two ways in post production.

Every NLE has a built in slo-mo capability. Some do their job better than others. There are also high end plugins which can analyze motion and create new video frames by using sophisticated mathematical calculations.

Varicam cameras from Panasonic shoot at 59.94p regardless of the intended frame rate. For example if you are shooting a film production at 23.98p the camera is really shooting 29.94p and using an equivalent of 3:2 pulldown to achieve the cadence of film. This feature can be used for acquisition of off speed shots much the same way a film camera can be overcrancked or undercrancked.

When you shoot at higher frame rate the result in post production is slow motion. When you shoot are lower frame rate the result in post production is fast motion.

Click here for slow motion for live switched events.

Widescreen

Anything wider than 4:3.

Any aspect ratio wider than 4:3 is commonly referred to as “widescreen.” HD is natively widescreen by definition because of its 16:9 aspect ratio.

Widescreen can be achieved in SD by letterboxing which shows the full width of the original material.


widescreen vs. 4x3

Fig 1. widescreen vs. 4×3

Compression in HD

For the time being it’s all compressed.

HD size video requires a lot of room on tape or in NLEs. Compression is a necessary evil. At this time all high definition tape formats use some sort of compression. Higher compression ratio results in less quality.

There are more factors that determine tape format quality than compression ratios so this list should be taken only as a rough guide.

HDCAM SR 2.7:1

D5 4:1

DVCPRO HD 6.7:1

HDCAM 7:1

HDV 47:1

Higher end NLEs can handle uncompressed video but can also use compression in order to manage high disc storage requirements of HD video.

HD Blank Tape Length

Depends on the standard you’re working in.

HD videotape runs at different speeds depending on the standard you are using. Running time of HD tapes sold in the U.S. is indicated for 59.94i frame rate. This standard is the “fastest” and will result in the shortest running time.

Let’s see how this works. A 64 minute tape will give you these running times:

HD standard: 59.94i 50i 23.98p

running time: 64 min. 76 min. 80 min.

Not bad, you get more tape for less money. The simple formulas you can use are:

50i RT = nominal RT x 1.19

23.98p RT = nominal RT x 1.25

Above formulas do not apply to DVCPRO HD.

Clipping and Crushing Video?

OK if intentional, not OK if not intentional.

Analog video broadcast standards allow transmission of signal brighter than pure white and darker than pure black. While this is counterintuitive there are technical reasons for the headroom and toeroom of video signal in both analog and digital domains.

Signal excursions outside of maximum and minimum levels can in certain cases affect the integrity of the signal. In order to prevent illegal excursions above the maximum level the signal may be clipped. Likewise, low levels can be crushed so they flatten at the minimum allowed level. Clipping is often performed prior to analog signal transmission by TV stations.

Clipping and crushing is sometimes performed for creative reasons in color correction. The result of clipped signal is uniform white (or solid color) without any detail (note the white shirt detail). The result of crushed blacks is pure black without any visible detail [Fig.1].

Clipping and crushing in post production is a valuable tool but clipping and crushing in camera or telecine can create unwanted results and should be generally avoided. Clipped and crushed video is devoid of detail information in the affected areas. A crushed night exterior can not be color corrected to show more detail because the detail was irretrievably lost.

Some network delivery specs warn against excessive clipping and crushing. Check the spec before reaching for the scissors.

video clip and crush

Fig. 1. Excessive Video Clip and Crush

SD Downconversions for Offline Edit

Not necessary, but recommended.

Let’s say you have 35mm film negative transferred to D5 and you’re finishing your film in HD. Should you make SD downconversions of your dailies? If you have a D5 video tape recorder (VTR) sitting in your office you don’t have to. Of course, it is helpful to have SD tapes so you can make additional dubs without having to use your master tapes.

You can digitize a downconverted video straight from an HD VTR into Final Cut Pro or an Avid. Certain procedure must be followed when using this approach. Failing to do so may compromise timecode tracking and render your offline useless for final offline purposes. The procedures depend on the type of VTR, the NLE you are using and the frame rate of the project you’re creating.

Safe Title in HD?

Wider than SD but beware.

Safe title is the area recommended for title and essential information placement in the frame. Anything too close to frame edges may get covered by the TV set cabinet body or lost due to other reasons.

Because of 16:9 aspect ratio the safe title area in HD is wider. However, titles placed at the edge of the HD safe title area will get cropped off by “center crop” downconversion to standard definition video [Fig. 1].

It is wise to consider the 4:3 safe title when titling HD material. You can download safe title charts here:

1080 safe title chart, jpg format

1080 safe title char, tif format with alpha

720 safe title chart, jpg format

720 safe title char, tif format with alpha


hi def safe title


4x3 protect

Fig. 1. Unprotected Title is Cropped Off in SD 4×3 Center Extraction